Celebrating Girls in Technology - Part Two

A few weeks ago, I made a post on celebrating inspirational female figures within technology. This post is going to be a carry on from that post. There’s clearly a lack of representation within STEM fields, specifically coding, of girls to look up to, so why don’t we take a minute to look at and reflect on the lives of women who’ve contributed to the field of Computer Science?

  1. Jean Bartik

thumbnail.jpg

Jean Bartik was born in 1924 in Missouri to a schoolteacher and a farmer. Most of Jean’s family were teachers and so she was destined to enter Northwest Missouri State Teachers College pursuing studies in Mathematics. Jean worked hard throughout her life to go into college as she was only supported by her aunt with $25 a month and also a part-time job in a local bookstore. Despite this, this didn’t stop Jean from applying to the University of Pennsylvania and developing the ENIAC computer!

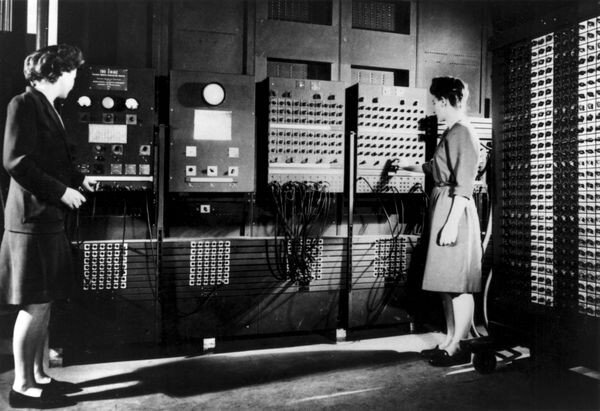
The ENIAC was the first original general-purpose computer which was able to solve complex calculations. This computer was so complex that Jean and four other girls became programmers for it and learnt how to use subroutines, nested subroutines and other programming techniques. Jean was recognised as an influential figure in 1988 by being introduced in the ‘Women in Technology International Hall of Fame’ and later receiving the ‘Joan S Korenman Award’ for being one of the first computer programmers!

2. Beatrice Worsley

An image of Beatrice Worsley.

An image of Beatrice Worsley.

Beatrice Worsley was the first computer scientist in Canada and gained the first PH.D known in Computer Science. Beatrice was born in 1921 and was homeschooled for her childhood. She was an incredibly intelligent woman and graduated from her high school with awards in science, mathematics and was acknowledged as one of the best students to attend the school. After gaining her academic qualifications, she chose to teach at the University of Toronto and at Queen’s University.

Outside of her achievement in academia, Beatrice is known for having written the first program to ever run on the EDSAC. The EDSAC was a ground-breaking machine which could run 650 instructions per second! Beatrice’s program was a square number program on the EDSAC!

3. Marissa mayer

For a more modern-day example, take Marissa Mayer as your source of inspiration. She formerly held the position of being the former president of Yahoo.

Prior to being the president of Yahoo, Marissa was a Stanford University graduate with an undergraduate degree in Symbolic Systems and postgraduate degree in Computer Science. After graduation, she was offered 14 job offers of where she joined Google in 1999 being the 20th member. She quickly worked her way up the ranks with a keen eye for detail and soon held key roles in all of Google.

In 2012, she became the CEO of Yahoo. She announced her resignation mid 2017 and is now currently pursuing research into artificial intelligence and consumer media.

girls can do it too!

There you have it - key examples of the amazing talent that women have contributed to the field of Computer Science. Here at Educademy, we offer courses and support for girls who want to get into coding but may feel like it’s just directed at boys. I hope that these articles have managed to convince you that this simply isn’t the case. No matter what background or gender your child is - our courses provide support for everyone. So, why not check them out?

Term-time Online Coding Courses for Primary and Secondary School Children From only £10/week Now Availabe

We are delighted to offer term-time live online coding courses in Scratch for primary school children and Python and Unity with C# for teenagers of secondary school age. Prices start as low as £10 per week. And yes - it’s paid weekly and you can cancel at any time.

Free assessment and trial lesson avaliable for all our term-time live online coding courses.

Web Scraping in Python

Web scraping is the process of gathering information from the Internet. This is often employed to extract large amounts of data from websites. Even copy-pasting the lyrics of your favorite song is a form of web scraping! However, the words “web scraping” usually refer to a process that involves automation. The large amount of data on the internet is a great resource for research or your own personal use; however, due to this large amount of data it can be difficult to get the right data that is useful to you. In this blog I’ll go over why you might want to use web scraping and how to do this using Python.

There are many reasons why you might choose to use web scraping. Often when you need to compile a lot of data, for research or personal use, it's a lot easier to write a program to do this for you instead of having to spend loads of time compiling the data yourself. This is particularly prevalent while training machine learning algorithms which often require a large amount of data to learn.

Web scraping is also often used as a quick solution to get a specific piece of data quickly, especially if there is no API (application programming interface) which can be used.

Some of the challenges of creating a web scraper program is the continuous growth of the world wide web. Website technologies are constantly changing and there is no website which is the same. This requires each website to require its own personal treatment if you want to extract the information that’s relevant to you. Another major challenge is durability. Websites are constantly changing and are in active development. Once the website structure changes, your web scraper might not work. This requires you to be constantly aware of changes to website structures so you are able to fix any issues quickly by updating your web scraper.

Creating our own web scraping program

We will be creating a basic program that scrapes song lyrics off web pages and writes them to a file.

bs.jpg

To start you will require to install two Python packages:

  • requests for performing your HTTP requests

  • BeautifulSoup4 for handling all of your HTML processing

You can install these dependencies with pip:

pip install requests BeautifulSoup4

At the top of our Python file we need to import the relevant modules that we require in our program.

imports.PNG

Next we need to create a function which downloads the web pages. The requests package allows us to do all things HTTP in Python. We have created a function here called getContent() which attemps to get the content at the parameter URL by making a HTTP GET request. If the response it good it executes getLyrics() function which we will see later else prints that the song cant be found. If an error occurs during the request the logError() function will be called with the parameters of the error.

1.jpg

If the response is an HTML response then isGoodResponse returns True, otherwise False is returned.

2.jpg

If an error occurs while running the HTTP GET request the logError function is run and prints the error to the console.

3.jpg

Once we know the response is actually an HTML response we can start parsing the HTML response. We can do this using the BeautifulSoup4 module which we have imported at the start. After parsing we can find specific html elements which we can use to get the lyrics from the web page. Once we have the lyrics, we call the writeToFile() function with input parameter of the lyrics.

4.jpg

This short function writes the lyrics to a file called lyrics.txt which is located in the same folder as this Python script. It will either create the file if the file is not there or replace any text in the file already with the new lyrics.

5.PNG

Lastly, we will create a main() function which is used to get the relevant data from the user before passing on the data to the getContents() function. At the end of the code we will call the main() function.

main.PNG

Hopefully by now you have created a working program which you can actually use to get lyrics for songs! This is just the start of what you can use the BeautifulSoup4 and requests modules for.

Would you like to learn more about python?

Join us at one of our Online Summer Camps for Kids and Teens to learn more about the cool things you can do with Python and with other programming languages!


Author: Robert Nimmo

References:

  • https://funthon.files.wordpress.com/2017/05/bs.png?w=772

  • https://www.antevenio.com/usa/wp-content/uploads/2019/12/web-scraping-1024x536.jpeg

Share your Unity game on the web!

Have you ever wanted to showcase your game on a website? Here is a quick walkthrough on how to upload your Unity project through Unity Connect.

In this example, we'll use the FPS Microgame. But you can follow these steps for any of the Microgames available through Unity Hub. Before you can share your game on the web, you’ll need to have the “WebGL Build Support” module installed in your editor.

To verify if you have the module installed, launch the Unity Hub, then select the Installs tab.

You will see all the editor versions you have installed.

Look at the latest version you have installed, in this example we use 2018.4 LTS, and verify that there is an “HTML 5” icon in the tile.

WebGL.png


If that icon is present, then you have the “WebGL Build Support” module installed, and you can skip this section.

If that icon is absent, then you will need to update your editor.

Add the WebGL Build Support module to your Unity Editor version


To add the module to your editor, click the “Menu” icon in the top right corner of the tile:

And select “Add Modules” from the dropdown menu.

002.png

Then select “WebGL Build Support” in the following pop up menu.

Then hit "Done".

Share Your Game to the Web

Above is an example of what your personalized game's web page will look like that you can share with anyone. As you can see, you will need an image of your personalized game. Let’s get that first. We recommend just going into Play mode and taking a screenshot from somewhere within your game! You'll need that image toward the end of these steps.

Next, add the WebGL Publisher package in the Unity Editor:

1. From the file menu, select Window > Package Manager.

001.png

2. In the Package Manager window, find the WebGL Publisher package (scroll the list on the left, or search with the search bar). This package was formerly called “Share WebGL Game” (as seen in the screenshot). Make sure to install version 1.2 of the package.

If you’re still running on Unity 2018.4, you’ll still see Share WebGL Game in your Package Manager window. In that case, make sure you’ve installed version 1.0.x to continue with this mod. That’s the version compatible with your current editor version.

Note: Your Microgame might already come with the WebGL Publisher package. If your package says “Update” instead of “Install” you can skip below to #4.

001.png

3. Click Install. This will take a few minutes.

Next, create a build of your project that you can share to the Web.

4. From the file menu, click File > Build Settings.


5. This opens the Build Settings window. Click Add Open Scenes to make a build of the scene you have open.

6. Select WebGL from the list on the left.

7. After selecting WebGL, depending on your settings, you might have to do one or two additional steps, but if you see a “Build” button in the lower right of the Build Settings Window, go to step 8 now. Otherwise:

  • If you don’t see “Build” but you see “Switch Platform”, click it, then continue.

If in the middle of the window you see “No WebGL module loaded” then you need to install this module from the Unity Hub. Unfortunately clicking the “Open Download Page” button does not currently work.

  1. Save and close your game/project (close Unity).

  2. Open the Unity Hub app and click Installs from the left sidebar.

  3. Under 2018.4.x LTS click the settings icon.

  • Click Add Modules

  • Select WebGL Build Support from the list of Platforms > Done

  • The module will install, and after successful installation, you’ll see this icon appear:

  • Click Projects and open your Microgame Project.

  • Now you can start at #4 above. Note for #4: Since you will have already clicked “Add Open Scenes” you’ll just need to √ check the box next to the scene name in the “Scenes In Build” section of the Build Settings window.

8. Click Build. This will take a few minutes.

9. Save the build to a local folder on your computer. Note: Do not save it in the same folder as your Project, pick a new destination.

Finally, share the build you just created to the Web.

10. From the file menu, click Window > Share WebGL Game

001.png


11. Add a fun name and image for your game. Remember, the name and image will show up publicly and it will be the first thing people see on your game's page!

001.png

13. A link is automatically generated that you can now share with friends and family so they can play your game! You and anyone you share the link with can view your game by clicking on the link.

14. Complete more mods, then repeat from step 4 to automatically update your game’s webpage to the latest build.

Note: Make sure to copy and save the link to your game in a location where it will be easy for you to access it again. But you can always find the link on your Unity Connect profile page, see the next step for details.

Access the link to your game via Connect

You can always find the link to sharing your game on your Unity Connect profile page (requires login).

  • Login to Unity Connect.

  • Click on your user icon then user name, which takes you to your profile home page.

  • Click on the “Games” tab in the navigation menu.

  • Click on the title or image of your game, which will take you to a page that displays the shareable link.


Best Video Games for Kids - Both Educational and Fun

Usually, people have an idea of kids lazing around all day on video games - not learning anything at all. This is so far from the truth!

Video games, while fun to play, can be educational at the same time. In this blog post you’ll discover some fun games which children can try out and learn at the same time for both consoles and mobile devices.

1. ScribbleNauts Mega Pack(Nintendo Switch, Playstation)

An image of the Scribblenauts mega pack video game

An image of the Scribblenauts mega pack video game

ScribbleNauts offers a fun experience with characters called Lily and Maxwell. ScribbleNauts is a fun puzzle solving game where children can use their imagination to solve puzzles – did you know that ScribbleNauts has over 22,000 objects for children to choose from? This will no doubt strengthen their vocabulary, literacy skills and problem-solving ability. Not to mention that children can also play with their favourite DC comic superheroes.

2. Numbala(Nintendo Switch, Apple Appstore, Amazon Appstore, Google Play)

An image of Numbala

An image of Numbala

Numbala was developed based on scientific research at the University of Torún. This game increases children’s understanding of number relations without them even realising. While they’ll be having fun experiencing a sidescrolling shooter, they’ll be learning maths in a visually appealing way.

3. Professor Layton(Nintendo DS/3DS/Switch, Apple Appstore, Google Play)

An image of the Layton Series.

An image of the Layton Series.

If I could recommend any game within this list, this would be it. Professor Layton is a classic Nintendo puzzle-solving game. This brilliant and charming puzzle-game takes place with archaeologist and professor Hershel Layton where you will solve a wide variety of mysteries. Not only does this improve your child’s memory, this also teaches them valuable logic skills through a series of minigames. My personal recommendation would be Professor Layton and the Azlan Legacy.

4. Drawn To Life(Nintendo DS/Wii, Apple Appstore)

An image of Drawn to Life: The Next Chapter

An image of Drawn to Life: The Next Chapter

Creativity is a very important skill for children to have, and this game certainly encourages it. Drawn To Life is an action-adventure platform game which allows children to truly express themselves. This game features a drawing tool which allows children different colours, brush types and stamps. This game allows for the ultimate artistic freedom. My recommendation for this one is Drawn to Life: The Next Chapter but if your child enjoys Spongebob, there’s a game for that, too.

5. SimCity(PC, Nintendo Wii/DS, Playstation, Apple Appstore, Google Play, Amazon Appstore)

An image of the mobile game, Simcity: Buildit

An image of the mobile game, Simcity: Buildit

SimCity is a game that allows children to build their own city. It starts out simple but evolves into a complex experience. This game teaches children concepts like city planning and about the environment(as well as natural disasters).

6. Minecraft(PC, Nintendo Switch, Apple AppStore, Google Play, Amazon Appstore, Playstation, Xbox)

A recent image of Minecraft

A recent image of Minecraft

No list like this would be complete without mentioning Minecraft. Minecraft is a famous game created by Mojang. The main “survival mode” teaches children how to survive the night by exploration, crafting and learning what they need as they go. However, it also features a “creative mode” to encourage children’s creativity skills by allowing them to create whatever they want using blocks. To top it all off, Minecraft can also teach children programming skills by allowing them to edit the game’s code so that they can create or change whatever they want!  

In short, video games can be truly educational and engaging at the same time. If your child is interested in video games, why don’t they try and create their own? Educademy offers free online Summer camps and courses about getting started on creating their own video games.

Author: Sophie Dillon

Why learn Python?

If you’re thinking of learning Python, or if you recently started learning it, you may be asking yourself: 

“Why learn Python and what exactly can I use Python for?”

ezgif.com-webp-to-jpg.jpg

Learning any programming language is becoming more and more important due to how digitally connected we all are. There are many programming languages but very few find the right balance between powerfullness and simplicity. Python is one of the few exceptions. Currently Python is one of the most popular programming languages used right now in large companies and startups. Large companies like Google, Spotify and Netflix are all using Python on a daily basis, so there is a good chance you have been using something that runs using Python even if you didn’t realise it was.

Not only is Python popular but it is also a great starting language to learn, with its simple and concise syntax which helps you not get confused while writting your Python code and with help from Pythons large collection of libraries you are able to do so much from the beginning. Problems which are complex in other programming languages can be completed in 1 or 2 lines of code in Python due to how beginner friendly Python is. This allows you to start making Projects you actually want to do very quickly.

Snake Game - One of the projects covered in our course

Snake Game - One of the projects covered in our course

Python is especially powerfull and useful when dealing with large collections of data as its very easy to manipulate this data using Python efficently. This is a large reason large companies are flocking to use Python. But that doesn’t mean Python is only useful for manipulating data; You can do so much more with Python! Did you know you could create games, build websites and even develop AI and machine learning programs in Python!

By having a good understanding with Python, it will help you learn more complicated programming languages in the future, for tasks that Python is not as good at, and improve your problem solving and creativity skills. Alot of universities are also using Python as the first languages that they teach their students, so learning early will give you a great headstart if you plan to study Computer Science at university!

So why not join one of our online Python summer camps and we will explore the cool projects you can develop in Python together.

print ("I love learning in Python!")

Creating Minecraft plugins using JavaScript

JavaScript and Java in Minecraft

Typically, Minecraft plugins are programmed in Java. This is the language Minecraft is made in. However, compared to JavaScript, Java can be quite a challenging language to learn. We can develop our own Minecraft Plugins using an existing plugin that allows us to run JavaScript code in Minecraft. ScriptCraft allows for JavaScript commands to be executed from within Minecraft. You can do basic mathematical operations or run complex scripts, and anything in between.

Getting Started

You will need to install a Spigot / Paper Spigot server. Head over to our How to create a Minecraft Server blog to see how to download and install a server. If you wish to install a Spigot server instead of Paper, follow the paper instructions but instead download a Spigot server.

Installing ScriptCraft

Head to https://github.com/walterhiggins/ScriptCraft/releases/tag/3.4.0 and download ScriptCraft.jar once downloaded, place the file inside your plugins folder. Once inside your plugins folder, run the server again. To confirm it is installed correctly type in the console: “js 2+2”. If this returns 4 then ScriptCraft is installed correctly.

Installing Notepad++

Navigate to https://notepad-plus-plus.org/downloads/ and download and install the latest version, this is what we will code our JavaScript in.

Useful Commands

You can use /js refresh() to check for any changes you have made to your plugins. This means that you will not need to keep restarting the server.

Your First Plugin

Open Notepad++ and type:

exports.greet = function( player ) {
    echo( player, 'Hi ' + player.name);
}

Save the file into Plugins/ScriptCraft/Plugins folder and name your script hi. Make sure to change the file type to All Files

Inside the Minecraft server type: /js hi(self)

jscommand.png

It will then display Hi {Your Player Name}.

serverreply.png

To further develop your plugin check out our JavaScript & Web Development course where you will learn how to program and develop your own website which you will then be able to transfer your skills gained into programming in JavaScript to create your own plugins. Once you are proficient in JavaScript you can move onto programming in Java to create even more plugins and begin creating Minecraft Mods

Creating a Vanilla / Paper Minecraft Server for Windows with Port Forwarding

Step 1

Download and install the latest version of Java for your version of Windows.

Click on the Java Download button and then run.

Click on the Java Download button and then run.

Click through the installer, you my have to restart your PC for this step.

JavaInstall.png

Step 2

Select which type of Server you want to download. A Vanilla server will run exactly like a single player world or you can select the Paper version which is more efficient and can have plugins installed but may have altered behaviour compared to a single player world / Vanilla server.

Vanilla

Download the server from: https://www.minecraft.net/en-us/download/server

Paper Spigot

Download the server from: https://papermc.io/downloads

Step 3

While the server downloads make an easily accessible folder and then place the downloaded server inside. For example, place the folder on your desktop. Rename the .jar file to “Server”. Then open the command prompt, the quickest way to do this is pressing Windows Key + R, typing cmd and pressing enter.

When the command prompt is open type cd and then the path of the Minecraft server folder.

DIR.png

Step 4

Run the server for the first time with the following command:

java -Xmx2G -Xms2G -jar Server.jar

The “2G” can be changed to whatever amount of RAM your system can handle giving to minecraft.

Step 5

The EULA, your server should have come up with an error. Navigate to the EULA.txt file and open it. Set the false value to true. Then re-run your server using the command from Step 4.

Step 6

Check the server is working by opening Minecraft, Multiplayer and then Direct Connect. Type localhost and hit connect. If the server is working you will load into the world.

Step 7

The final step is to port forward your server so your friends can join. The following example is for a Virgin Media router, but the steps are similar on any other.

Step 7.1

Find your local IP address, using the command prompt type “ipconfig” and look for IPV4 Address. That value is your local IP.

LocalIP.png

Step 7.2

Login to your router, your router should have an IP address on the back of it. Type this into your browser.

portforward.png

Step 7.3

Add a new rule, make sure to fill in the port numbers as 25565. If your router requires a Local IP address, type in the IP from Step 7.1. Click apply and then make sure to save the new rule.

PFRule.png

Plugins

Plugins are coded in primarily JavaScript. We offer a JavaScript and Web Development camp that can give you the foundational knowledge to then begin coding your own Plugins.

Publishing a Unity Game

We have published a game and have put it on our website, Maths Monkey. This free game is made using Unity tests odd, even and prime number recognition as the player throws bananas at plants depending on the number that is shown.

Unity comes with multiple different platforms a build can be delivered on. Since we want a web game, we will build an HTML 5 Unity WebGL version. This is a module that needs to be installed, but you can do that within Unity.

MathMonkeySimmerEmbed.png

The Steps

Open the Build Settings menu with Ctrl + Shift + B or Navigate there using File > Build Settings.

build.png

Once the menu is open, select WebGL. If you need to install it click on “Open Download Page”

webdl.png

When WebGL finishes installing, click Build. You will then need to select a folder for the build to be created in. Create a folder called “Build” so you can quickly find it.

buildfolder.png

The build will take a while to complete, depending on the power of your CPU. Unity is CPU intensive while building games.

When the build is complete you will have a inside your build folder an index.html and some other files.

indexbuild.png

The final step to publishing your build is uploading it to a website, Simmer IO is a great website for sharing Unity WebGL games. Go to: https://simmer.io/upload to upload your game.

If you want to learn how to make your own Unity game to share and publish you can view our course here.

We also have a list of some great Educational Unity Games that you can play in your browser

Video Game Camps This Summer For Kids Near You

Normally, parents don’t imagine that video games could be educational. Did you know that you can learn programming in a cool and creative way through the usage of video games? Educademy offers some amazing video game camps this Summer suitable for 7-16 year olds who want to learn coding while most importantly having fun! All of our Summer camps are available online and recorded.

Image credit: Scratch Google Play Store

Image credit: Scratch Google Play Store

1. Educademy’s Scratch Courses

Scratch is known as a block-based language allowing younger people new to programming learn to code simply through a usage of commands. Our introduction to scratch course offers a light and colourful approach to an otherwise complex topic. We offer a beginner-friendly course to people aged 7-9 or alternatively 10-12 which provides a suitable foundation to our intermediate Scratch course of covering animation and game development. We also provide a free 60-minute sample trial for BOTH of these courses - see more here.

2. Educademy’s Python Courses

Maybe your child already has knowledge of Scratch, and wants to convert to an actual programming language used everyday by experts. Or maybe your child wants to start off a little more advanced than usual? We also offer a Python course, of which the content shifts every week to cover a variety of different games in Python. We’ll offer a range of flexible arcade games to create like Pong or even your child’s own platformer game. All the while, they’ll be learning new computer logic and problem solving skills while having fun. Come along and try our Python course this Summer - book your free trial!

If your child has no knowledge of Python, we also offer an introduction to Python course which can be offered prior to this course. This course is based on gathering the necessary skills to truly understand and develop computer games within Python.

Image credit: Kart racing game in Unity/C#

Image credit: Kart racing game in Unity/C#

3. Educademy’s Unity/C# courses

Unity is a very popular game engine made for anyone to enjoy. Super Mario Run, Pokémon Quest, and Cooking Mama: Cookstar are all incredibly popular examples of what can be developed in Unity. Our experienced utors offer an incredibly friendly and insightful experience into what seems to be a challenging game engine. In addition to this - Unity is in 3D. How cool is that? We also offer a beginner Summer camp course for Unity 3D and an intermediate course who want to learn even more C# to experience Unity’s full potential.

Here are some official images of amazing video games made in Unity(Ori and the Blind Forest, Super Mario Run, Pokémon Quest, Cooking Mama: Cookstar):

Why should my child get into video game development?

  • Video game developers can get paid up to £65,000.

  • Your child can get paid to do what they love. Video game development combines creativity with logical thinking so they can truly experience the best of both worlds.

  • A growing industry. The video game industry is dynamic and is constantly changing. The industry shows no signs of fading anytime soon!

  • More than just entertainment. Did you know that the army uses virtual reality exposure therapy to help their soldiers, or that virtual reality technology is often used in healthcare to help train doctors and nurses? Although entertainment may be one reason, you’re truly making an impact on the world with this industry.

Why choose Educademy?

Why not try one of our camps today? Use code SD-QCNQ-Z87X-SU20 for 20% off!

Author: Sophie Dillon