
Have you ever wanted to showcase your game on a website? Here is a quick walkthrough on how to upload your Unity project through Unity Connect.
In this example, we'll use the FPS Microgame. But you can follow these steps for any of the Microgames available through Unity Hub. Before you can share your game on the web, you’ll need to have the “WebGL Build Support” module installed in your editor.
To verify if you have the module installed, launch the Unity Hub, then select the Installs tab.
You will see all the editor versions you have installed.
Look at the latest version you have installed, in this example we use 2018.4 LTS, and verify that there is an “HTML 5” icon in the tile.

If that icon is present, then you have the “WebGL Build Support” module installed, and you can skip this section.
If that icon is absent, then you will need to update your editor.
Add the WebGL Build Support module to your Unity Editor version
To add the module to your editor, click the “Menu” icon in the top right corner of the tile:

And select “Add Modules” from the dropdown menu.

Then select “WebGL Build Support” in the following pop up menu.

Then hit "Done".
Share Your Game to the Web

Above is an example of what your personalized game's web page will look like that you can share with anyone. As you can see, you will need an image of your personalized game. Let’s get that first. We recommend just going into Play mode and taking a screenshot from somewhere within your game! You'll need that image toward the end of these steps.
Next, add the WebGL Publisher package in the Unity Editor:
1. From the file menu, select Window > Package Manager.

2. In the Package Manager window, find the WebGL Publisher package (scroll the list on the left, or search with the search bar). This package was formerly called “Share WebGL Game” (as seen in the screenshot). Make sure to install version 1.2 of the package.
If you’re still running on Unity 2018.4, you’ll still see Share WebGL Game in your Package Manager window. In that case, make sure you’ve installed version 1.0.x to continue with this mod. That’s the version compatible with your current editor version.
Note: Your Microgame might already come with the WebGL Publisher package. If your package says “Update” instead of “Install” you can skip below to #4.

3. Click Install. This will take a few minutes.
Next, create a build of your project that you can share to the Web.
4. From the file menu, click File > Build Settings.

5. This opens the Build Settings window. Click Add Open Scenes to make a build of the scene you have open.
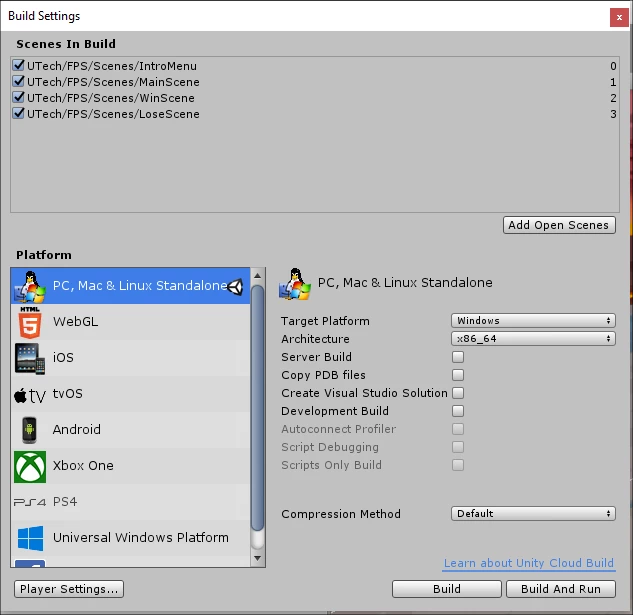
6. Select WebGL from the list on the left.

7. After selecting WebGL, depending on your settings, you might have to do one or two additional steps, but if you see a “Build” button in the lower right of the Build Settings Window, go to step 8 now. Otherwise:
If you don’t see “Build” but you see “Switch Platform”, click it, then continue.

If in the middle of the window you see “No WebGL module loaded” then you need to install this module from the Unity Hub. Unfortunately clicking the “Open Download Page” button does not currently work.

Save and close your game/project (close Unity).
Open the Unity Hub app and click Installs from the left sidebar.
Under 2018.4.x LTS click the settings icon.

Click Add Modules
Select WebGL Build Support from the list of Platforms > Done
The module will install, and after successful installation, you’ll see this icon appear:

Click Projects and open your Microgame Project.
Now you can start at #4 above. Note for #4: Since you will have already clicked “Add Open Scenes” you’ll just need to √ check the box next to the scene name in the “Scenes In Build” section of the Build Settings window.
8. Click Build. This will take a few minutes.

9. Save the build to a local folder on your computer. Note: Do not save it in the same folder as your Project, pick a new destination.
Finally, share the build you just created to the Web.
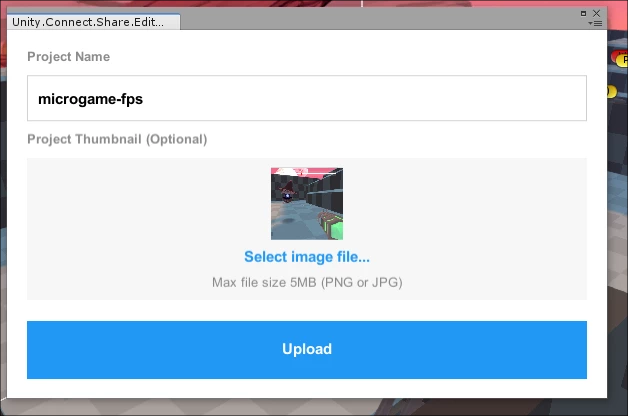
10. From the file menu, click Window > Share WebGL Game

11. Add a fun name and image for your game. Remember, the name and image will show up publicly and it will be the first thing people see on your game's page!
13. A link is automatically generated that you can now share with friends and family so they can play your game! You and anyone you share the link with can view your game by clicking on the link.
14. Complete more mods, then repeat from step 4 to automatically update your game’s webpage to the latest build.
Note: Make sure to copy and save the link to your game in a location where it will be easy for you to access it again. But you can always find the link on your Unity Connect profile page, see the next step for details.

Access the link to your game via Connect
You can always find the link to sharing your game on your Unity Connect profile page (requires login).
Login to Unity Connect.
Click on your user icon then user name, which takes you to your profile home page.
Click on the “Games” tab in the navigation menu.
Click on the title or image of your game, which will take you to a page that displays the shareable link.